
How to Remote Control in GoTo Meeting [New & Classic Versions]
In recent times, the world has been digitalized through remote networking. Employees who are away from their workstations must access their computers remotely. Or they need to control other people's devices to assist remotely. Enterprise remote working has expanded and led to the emergence of different remote control tools such as GoTo Meeting. Let's dive into a comprehensive guide about GoTo Meeting remote control to help you use it better for more efficient problem-solving.
- Overview of GoTo Meeting Remote Control
- GoTo Meeting Remote Control in New Version
- Controversy over New Version of GoTo Meeting Remote Control
- GoTo Meeting Remote Control in Classic Version
- GoTo Meeting Remote Control: New Version vs Classic Version
- Bonus: A User-Friendly Remote Control Solution for Android
Overview of GoTo Meeting Remote Control
GoTo Meeting is a virtual meeting platform designed for flexible working featuring screen sharing, video conferencing and remote control. This tool enables all the workers to connect remotely through an internet connection. As a result, collaboration and productivity are optimized, which is the basic need of enterprises. This means conducting virtual meetings and empowering the remote workforce with different features to communicate.
Some people think that GoTo Meeting is just an online meeting software, but it actually does a great job with remote control as well. During a GoTo Meeting session, the presenter can have multiple attendees share control of their keyboards and mice. This means that others can use their mouse and keyboard on your screen to enhance collaboration.
So, how do you remote control in GoTo Meeting? I'll provide you with two versions of the remote control method in later sections:
GoTo Meeting Remote Control in New Version
With GoTo Meeting's technological advances, remote control for requesting mouse and keyboard is now available to everyone. In this section, we will explore the new version of GoTo Meeting's remote control features:
How to Allow Participants to Request Remote Control
You must enable the appropriate permissions in the settings in order to perform remote control smoothly. Now, let's explore how to allow participants to request remote control:
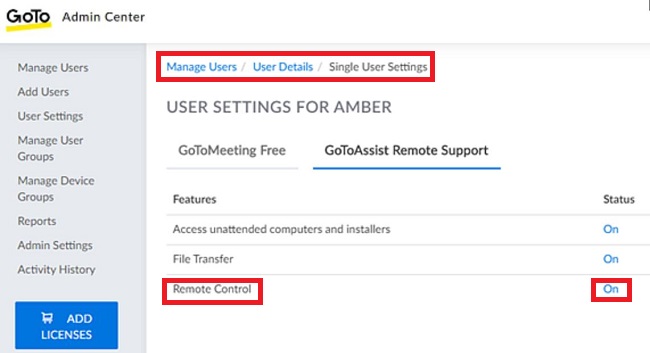
For Single User Remote Control Function Settings
Step: Log into GoTo Admin Center, select "Manage Users" > "User Details" > "Single User Settings" in the navigation menu, and turn on the "Remote Control" status.
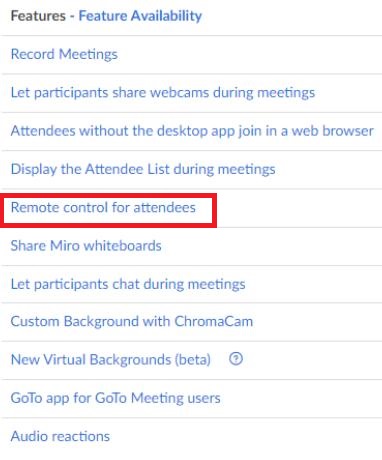
For Multiple User Remote Control Function Settings
Step: Log into GoTo Admin Center, select "User Settings" > "Feature Availability" > "Remote control for attendees" in the navigation menu, enable it and check "Let organizers choose if attendees can request remote control access."
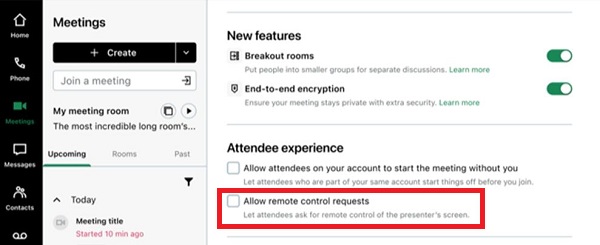
Next, the organizer must go to "Settings" > "Attendee experience" and enable "Allow remote control requests" option.
For Allowing Remote Control Requests during a Meeting
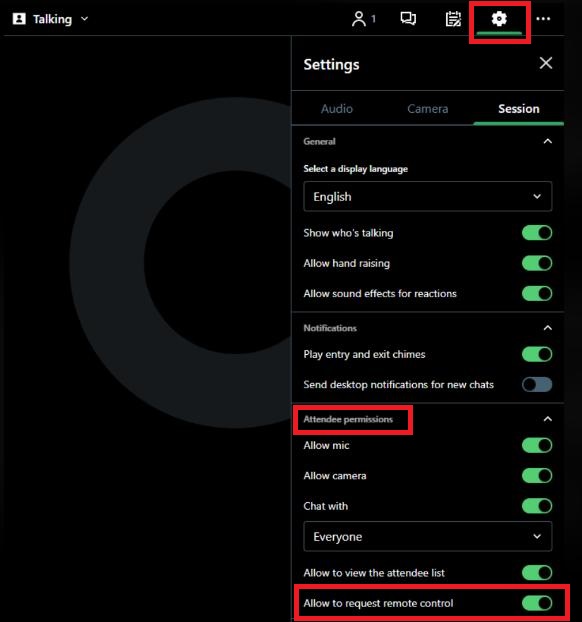
Step: After joining a meeting, go to "Settings" > "Attendee permissions" and enable "Allow to request remote control."
How to Provide Remote Control
Step 1: First, you have to start or join a meeting.
Step 2: Click the "Share" option in the bottom toolbar.
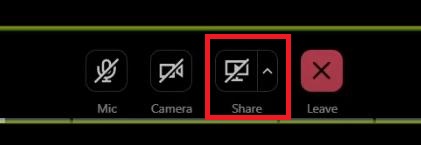
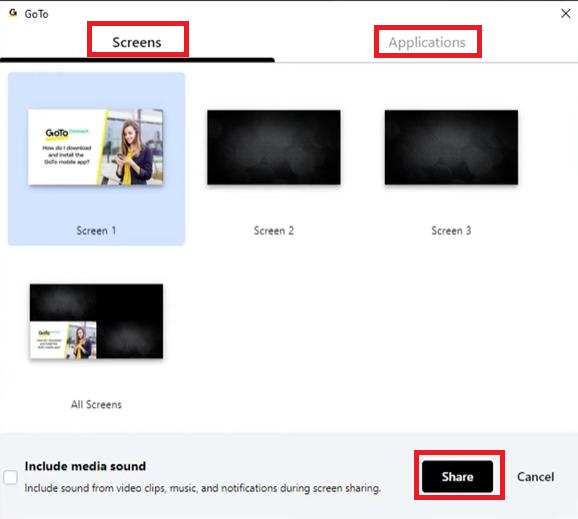
Step 3: Choose the screen and application you intended to share. Choose the "Share" option again. Next, you can use the remote control feature during screen sharing.
Step 4: To give remote control access, there are two ways, as given below. Follow one of them:
Way 1: (Recommended)
1. Select "Control" in the bottom toolbar and then choose the participant to whom you want to grant control.
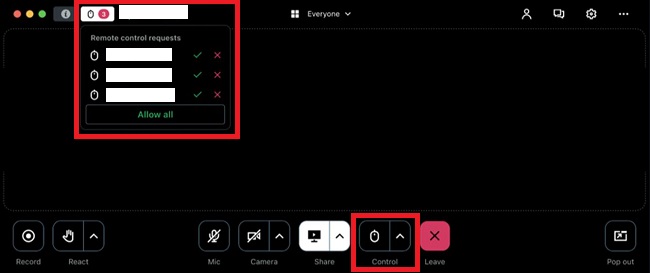
2. Presenters can see the available requests in the "Remote control requests" queue, from which they can choose to allow or deny requests.
3. To stop remote control access, choose "Control" to disallow everyone at once. You can also remove particular attendees from the list by clicking the arrow next to "Control."
Way 2:
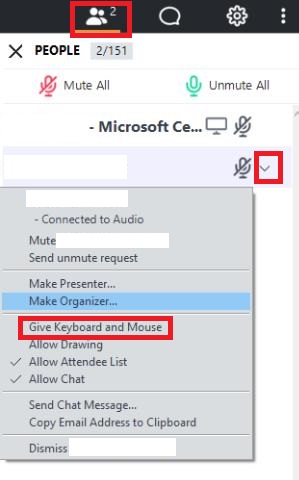
1. Choose the "People" pane, go ahead with selecting the attendee's name, and then click "Give remote control."
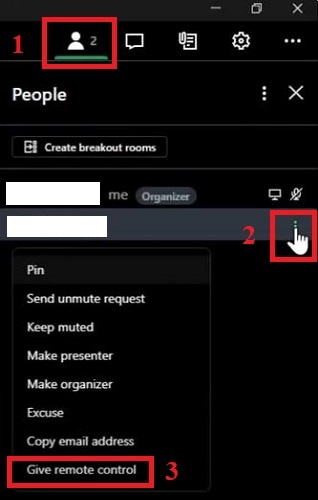
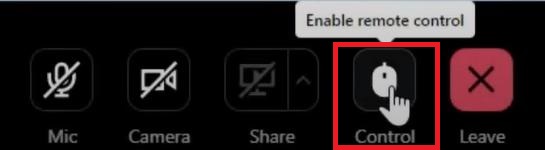
2. Your attendee(s) must select "Enable" from the "Control" option in the toolbar at the bottom.
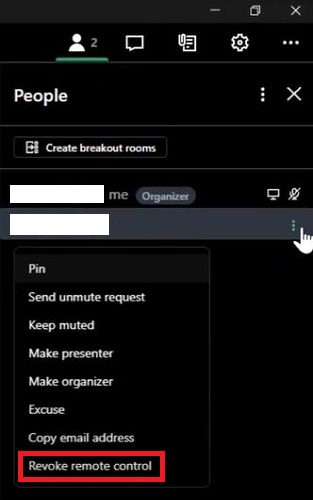
3. To stop remote control, select the "People" pane again, continue selecting the participant's name, and select "Revoke remote control."
Controversy over New Version of GoTo Meeting Remote Control
Some users in the GoTo Meeting community are confused and complaining about the new version of GoTo Meeting. They can't find the feature to request keyboard and mouse control when viewing someone's screen in GoTo Meeting, which is unfriendly for non-tech-savvy users. Here is a summary of a few user complaints about the new version of GoTo Meeting:
There are several problems in new version of GoTo Meeting remote control, including:
- "Requesting control and getting a user to share their screen is all driven by the user, needing the user to initiate and activate screen share, remote control, etc., through a series of steps that takes about 5 or 6 complex steps to achieve. "
- "Keyboard strokes are selectively sent through to the remote control screen."
- "Wheel mouse scrolling is reversed in remote control sessions, scrolling and zooming in applications such as graphics, illustration, and text constantly executes the exact wrong command being sent."
- "Remote sessions have an increasing progressive latency lag in video."
- "Recorded sessions on the local computer are very large webm files, and are unable to utilise any of the plethora of hardware accelerated video encoding available on the vast majority of computers today."
- "User interface cannot be maximised to remove buttons and borders about the screen to maximise the remote control space on smaller screens."
---Review by Rontechscaf
How to Switch to the Classic Version of GoTo Meeting
As the new version is imperfect, many users have a bad experience. Fortunately, users can switch back to the classic version of the GoTo Meeting app to use the remote control feature. Here, I have a detailed how-to guide to switch back to classic GoTo Meeting.
Step 1: Go to the link https://global.gotomeeting.com and sign in to your account.
Step 2: Navigate to the left toolbar and choose the "Settings" symbol.
Step 3: Click on the "GoTo App" and turn off "Use the new GoTo."
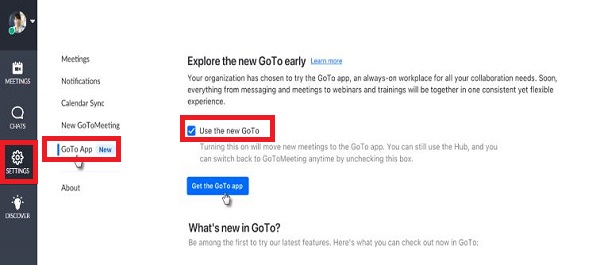
Step 4: For the next meeting, you will have switched to the classic GoTo Meeting desktop application.
GoTo Meeting Remote Control in Classic Version
After introducing how to switch back to classic version from new version of GoTo Meeting, I'm sure you are interested in how to remote control in classic version of GoTo Meeting. Next, I will provide you with a detailed step-by-step guide:
How to Share Keyboard and Mouse Control
You are allowed to grant keyboard and mouse control to several attendees at a time. There are two ways to do it; follow one of them to proceed.
Way 1: Press the "Arrow" symbol alongside the preferred attendee in the "People" pane and select "Give Keyboard and Mouse."
Way 2: Tap on "Remote Control" > "Give Access to" > Choose the preferred attendee in the "Presenter" bar. If you are a Mac user, select the "Everyone" option to grant keyboard and mouse control to all attendees.
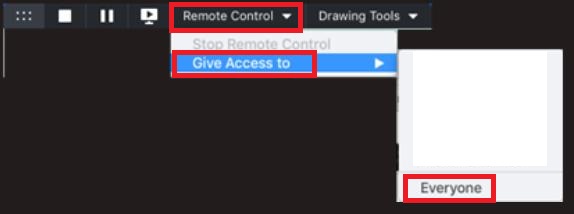
The attendees have a "Check" symbol beside their name and the keyboard and mouse control. A notification will appear to attendees that they have been allowed access to the presenter's keyboard and mouse.
How to Temporarily Control the Keyboard and Mouse
If you want to temporarily regain control of your mouse and keyboard, please refer to the following steps:
Step 1: Simply type and move your mouse to get control temporarily. The next participant is allowed to control your keyboard and mouse, but you rule over other person's movements.
Step 2: Once you have ended up, you can guide the other person to continue controlling your screen with keyboard and mouse control.
How to Remove Keyboard and Mouse Control
You can follow the same process as you have executed for giving keyboard and mouse control access.
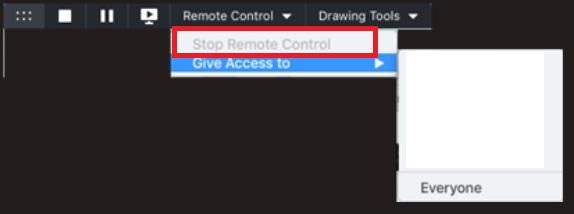
Way 1: In the "People" pane, uncheck the "Give Keyboard and Mouse" option next to attendees.
Way 2: Find "Remote Control" in the presenter toolbar and click "Stop Remote Control."
GoTo Meeting Remote Control: New Version vs Classic Version
GoTo Meeting enables remote control on both new and old versions. You can choose the version that suits you according to your usage habits. Here is a comparison between the use of new and classic GoTo Meeting remote control according to a user's point of view.
New GoTo Meeting Version | Classic GoTo Meeting Version |
To make an attendee presenter, press their name from the Attendee list. After that, tap on the notification entitled "Make Presenter." Right-click is not required. | Right-clicking on the particular attendees from the list is required to make attendee presenter. Then, move towards clicking the pop-up action "Make Presenter." |
Attendees must have to navigate the bottom of the GoTo Meeting screen to click on the "Share" symbol. Otherwise, they can't share screens. | A window notifying about a question whether you want to share screen appears on the attendees' window. |
Attendees can allow control after clicking "…", present on the upper-right side. Then, tap on the pop-up action "Give Remote Control". You are not able to request control further. | Scroll down the attendee list and right-click on their name to request control of the attendee's screen. After that, tap on the pop-up action "Request Keyboard and Mouse." |
To take actual control, you must click the "Control" button at the bottom of the GoTo application. | Attendees are presented with a pop-up window asking to confirm the granting of control. |
Bonus: A User-Friendly Remote Control Solution for Android
Do you want a user-friendly software to remotely control your Android device? AirDroid Remote Support is an all-around remote access, remote assistance, and remote control solution for enterprises. It is highly specialized in remote control of Android. AirDroid Remote Support can improve service efficiency by directly controlling a customer's device during a help session.
What's more, it also has a black screen mode under remote control. Black screen mode is a privacy-centric technology, which enables IT admins to hide the screen image of the remote device during the remote control session and a hint saying "This device is under maintenance" will be shown. This will ensure your sensitive data stay private as well as a smooth remote operation for your IT admins.
How to Remote Control in AirDroid Remote Support
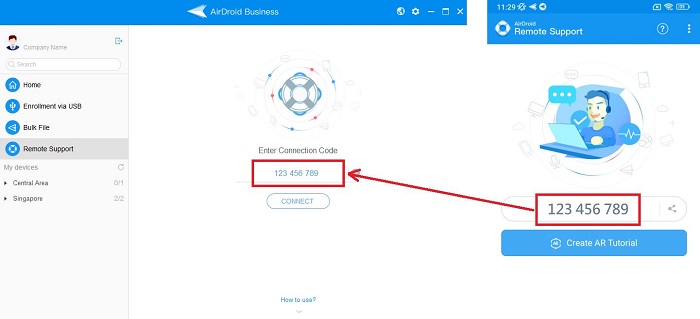
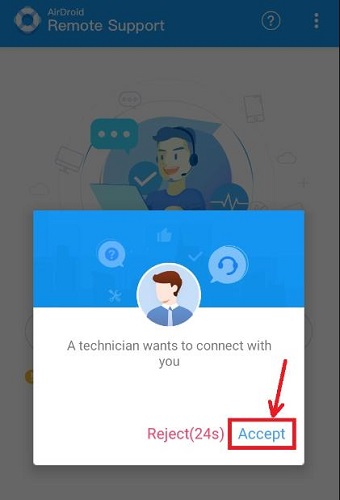
Step 1: From the AirDroid Business Desktop Client (supporter), enter the 9-digit code which conducts from the client’s mobile device. And the client needs to click "Accept" for the remote support session.
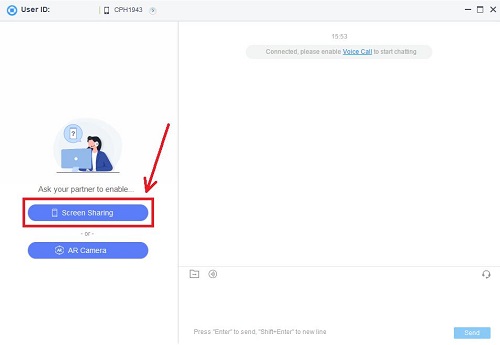
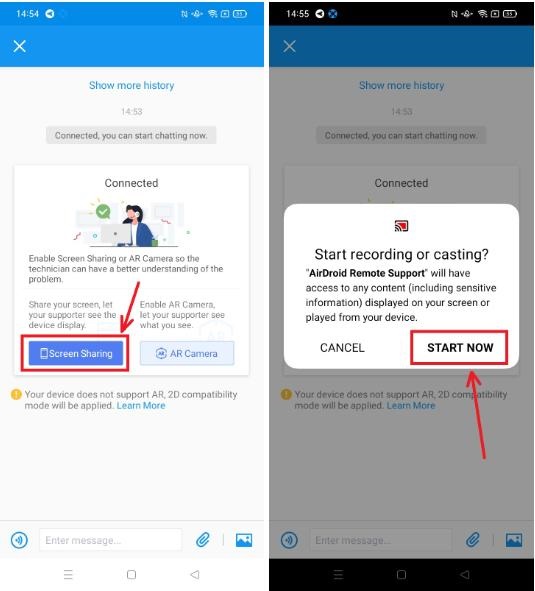
Step 2: Please click "Screen Sharing" first. It can be enabled from the Desktop Client or the mobile device. And ask the client to click "Start Now" on the mobile device to enable screen sharing.
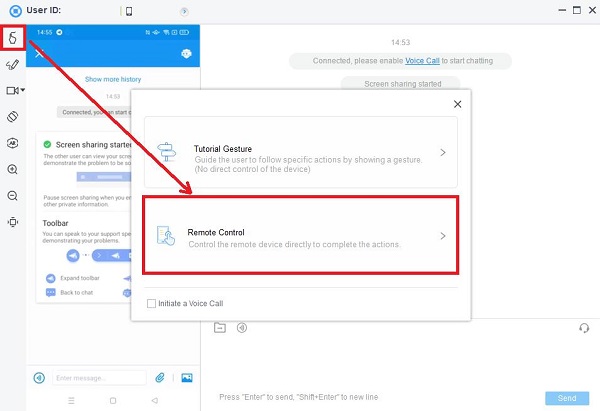
Step 3: From the AirDroid Business Desktop Client (supporter), tap the "Tutorial Gesture" icon on the left-hand side, then tap "Remote Control" to enter remote control mode.
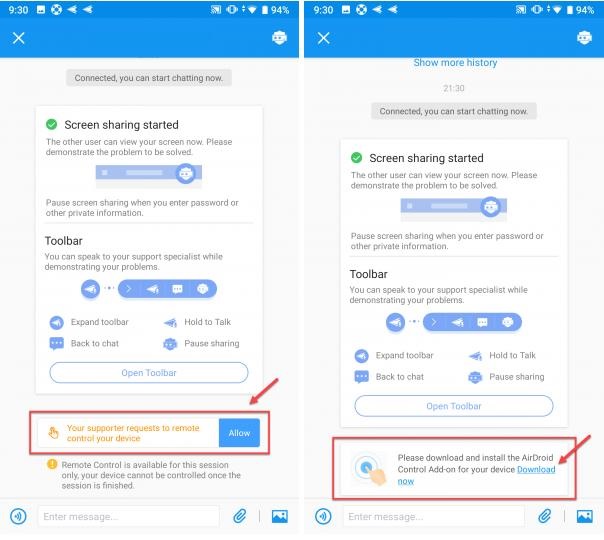
Step 4: Ask your client to tap the "Allow" and "Download now" buttons on their AirDroid Remote Support app, which will initiate the remote control add-on download process.
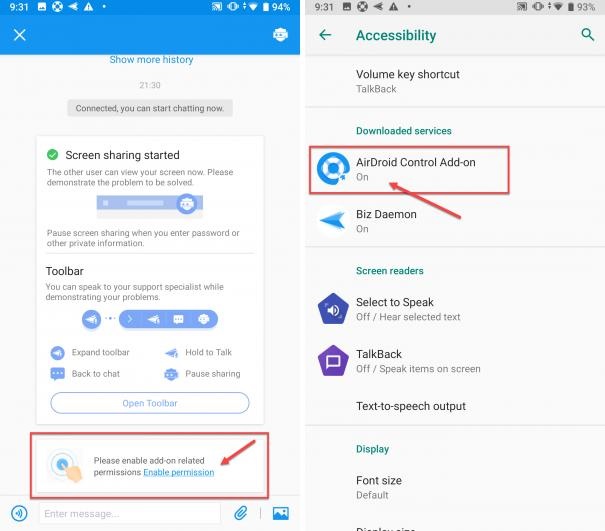
Step 5: Once the add-on is downloaded and installed, ask the client to return to the AirDroid Remote Support app and proceed with the following steps, "Enable permission" > "Installed services" > "Allow", for the add-on to work properly.
Step 6: After the add-on grants permission, the remote control will be enabled automatically.
Conclusion
The expanded network of digital businesses has led to the invention of multiple online platforms to connect employees remotely. But quality, along with secured services, is the main standard to grab enterprises and non-commercial users. People are intended to pick up software serving all the desired features under one roof, saving time and effort. We have covered GoTo Meeting and AirDroid Remote Support application. You can choose the software that suits your needs based on the device you want to control remotely.
Leave a Reply.